Are you having issues with your HP device (Laptop, Desktop, All in One, etc) and inability to access a previously mapped network drive labelled Z:
Recently a client contacted me with his mapped network drive missing. So I did what every other good IT technician does and just googled any type of keywords I could about it. Well it was a rabbit hole full of opinions and what worked for one person didn’t work for many others.
Here is my quick run down and hopefully the fix for your issue if you have the same as my client did this past week.
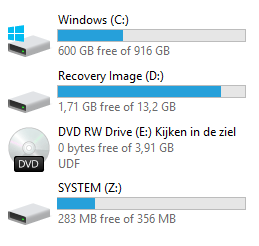
Apparently it has something to do with HP Support Assist and how it installs various software that it downloads or actually uses itself. Suffice it to say that it creates a RAM Disk and labels it “System Z:”
Well that probably doesn’t affect most users, but if you do use Z: for anything else it does. Because after every restart your mapped network drive doesn’t remap, but rather the RAM Disk used by HP Support Assist does.
So the fix?
I found it obscurely placed over on HP’s Community forum.
- Open up Command Prompt or PowerShell in Administrator mode
- Type in = “mountvol Z:\ /D“
- Press enter
- mountvol = the command used by CMD or PowerShell
- Z: = the drive letter in use
- /D = delete
After running this and restarting at least twice I was no longer presented with a “System (Z:)” drive, but rather just my C:
At this point I promptly added back the Mapped Network Drive and all is well in the wide world of IT again.
FYI things I tried prior to this that DIDN’T WORK!
- Adding 2x registry settings called “NoDisk” with an obscure value – FAILED
- Running HP Support Assist and attempting to get it to clear itself – FAILED
- Removing HP Support Assist – FAILED
- Using diskpart and removing the drive letter, it would just re-add itself on boot – FAILED